
General Ledger Journal Listing
This report will show posted journal vouchers based on the selections entered.
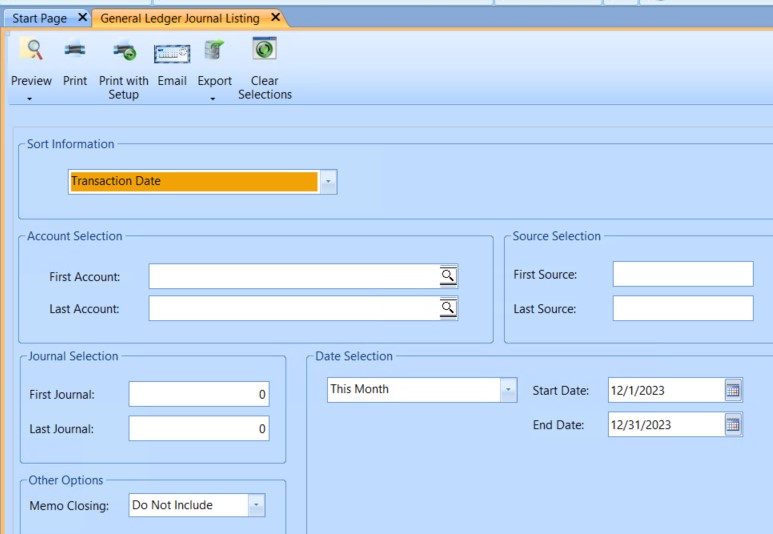
![]() NAVIGATION: REPORTS menu > General Ledger Reports > Journal Listing
NAVIGATION: REPORTS menu > General Ledger Reports > Journal Listing
- Sort Information
- Sort the information on the generated report by one of the following options:
- Account Number - sort by account number order
- Journal Entry Number - sort by journal number
- Source - sort by source
- Transaction Date - sort by transaction date.
- The selected sort option will have a great effect on how long it takes to run this report.
- Pick the sort option that will have the specific information you are trying to find.
- For example, if looking for Journal Entry Number 1897 - 1899 select Journal Entry Number as the sort option. If looking for transaction date 6/30/2023, then select Transaction Date as the sort option.
- Sort the information on the generated report by one of the following options:
- Account Selection: Enter or select an account range to restrict the report to the selected accounts, or leave blank for all accounts.
- First Account
- Enter or select an account to begin the report with, or leave this field blank to begin with the first account.
- If an account number is entered in this field and the last account field is left blank, the report will only be for the account number entered in the first account field.
- Last Account
- Enter or select an account to end the report with, or leave this field blank to end with the last account.
- If the first account field is left blank and an account number is entered into the last account field, the report will begin with the very first active account and end with the account entered as the last account.
- Source Selection
- A source may be entered for each line of a journal voucher.
- Some sources are generated during a posting process and interfaced into the general ledger.
- For Example: When Accounts Payable Vouchers are posted the journal entries that are created will have a source of AP. When payroll is posted the journal entries that are created will have a source of PR. If both source fields are left blank the generated report will include all sources.
- First Source
- Enter a source to begin the report with, or leave the field blank.
- If a source is entered into the first source field and the last source field is left blank, the report will be generated for the first source only.
- Last Source
- Enter a source to end the report with, or leave the field blank.
- If a source is entered into the last source field and the first source is left blank, the report will include all sources up to the one entered as the last source.
- Journal Selection
- Enter journal entry numbers into the field to generate a report based on JV numbers.
- If both first and last journal fields are left blank the report will include all journal numbers within the other specifications selected.
- First Journal
- Enter a journal number into the first journal field to begin the report with the information from it.
- If the last journal field is left blank, the report will be for the journal number entered as the first journal number.
- If a last journal number is entered, the report will be for all journal entries that are in the range.
- Last Journal
- Enter a journal number into the last journal field to end the report with it, or leave the field blank.
- If a journal number is entered in the last journal field and the first journal field is left blank, the report will include all journal numbers within the other selection criteria up to and including the journal number entered.
- Date Selection: Select one of the following:
- All
- This Month
- Last Month
- This Quarter
- Last Quarter
- 1st Quarter
- 2nd Quarter
- 3rd Quarter
- 4th Quarter
- This Year
- This Year to Date
- Last Year
- Last Year to Date
- Custom (allows you to select your own dates)
- Start Date and End Date: Based on the date criteria selected, the start and end date will automatically fill in a date range with the following exceptions:
- If Custom is selected the start and end dates will be blank allowing the user to enter a "custom" date range.
- If All is selected, the beginning date is left blank and the ending date will be the current date.
- Displayed date ranges may be edited.
- Memo Closing: Select one of the following Memo options:
- Do Not Include
- Include
- Only Memo Entries
- Print, preview, or save the report (see Report Preview, Print and Save Options).
- SAMPLE
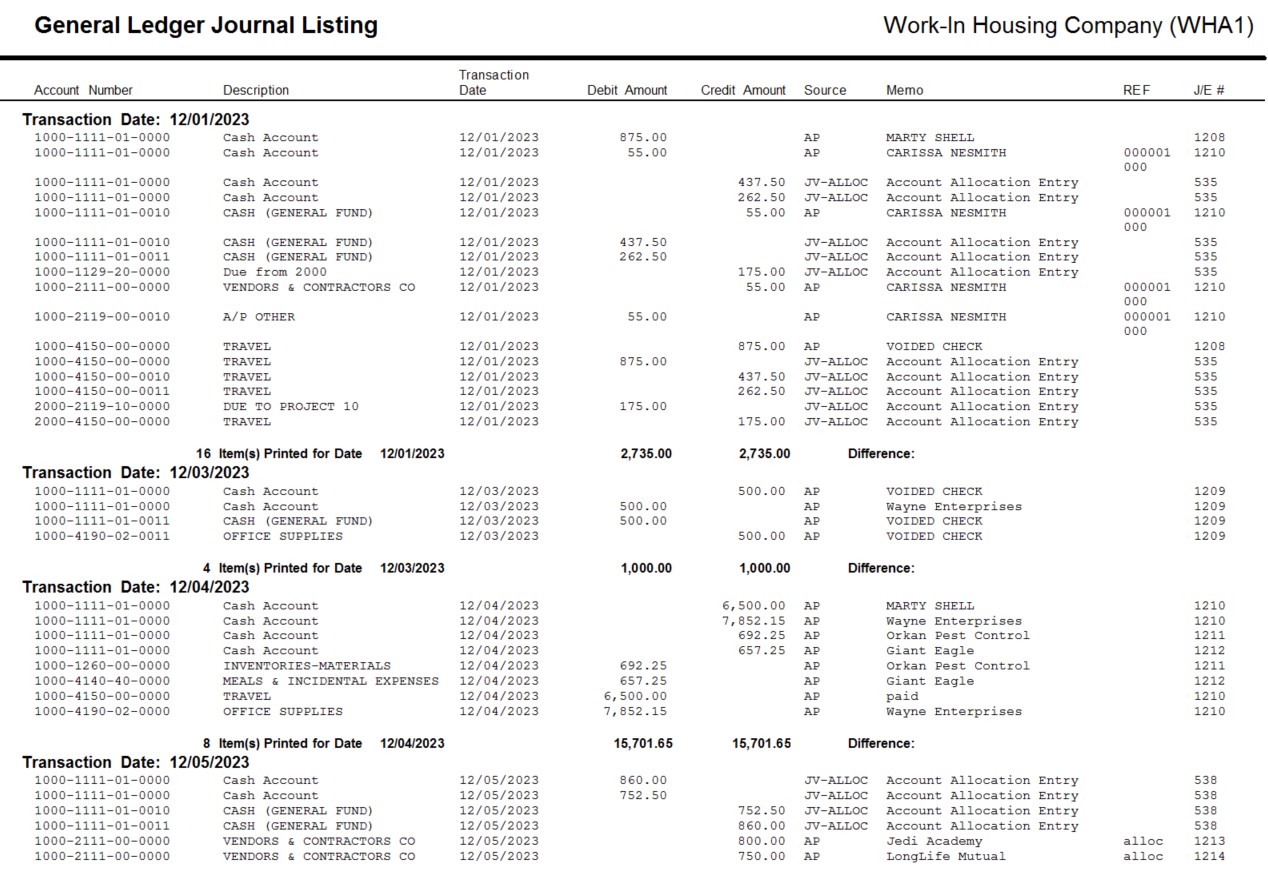
12/2023